RSC 2-8-0 CONSOLIDATION

This forum is for discussion of any DTG products in development and also WIP Reports of DTG's DLC products

Re: RSC 2-8-0 CONSOLIDATION

Unread postby mrennie » Sun Feb 10, 2013 6:24 am

UP3985 wrote:They may not be the speediest because
1. The 844 is out for the winter on maintenance, and I do not live in Cheyenne
2. I usually only get to see it at least once a year (September) so the ruler request may not come for quite a while, but I think there is plenty to work on onthe outside. !!*ok*!!


Yep, I'll have plenty to do when the drawings arrive. I'll be glad of any help I can get !!*ok*!!
User avatar
mrennie
 
Posts: 3214
Joined: Wed May 30, 2012 12:22 pm

Re: RSC 2-8-0 CONSOLIDATION

Unread postby johnmckenzie » Sun Feb 10, 2013 6:50 pm

Some more screenshots of this have appeared on Facebook - if you haven't been there recently then I respectfully suggest you have a look. The attention to detail on this loco is unbelievable. Great work, and an absolute MUST HAVE for USA fans.

Respect.
User avatar
johnmckenzie
 
Posts: 642
Joined: Sat Mar 12, 2011 8:17 am
Location: Lancashire, England

Re: RSC 2-8-0 CONSOLIDATION

Unread postby ozinoz » Sun Feb 10, 2013 8:01 pm

Mike's farcebook page has some great pics - well worth a look. Finally a decent headlight projection :D

Just how did you get such great texturing on this loco. **!!bow!!** I want to start re-skinning (have some bits and pieces I want to do for Tori's wonderful COA route), but looking at this leaves me in awe and feeling very inadequate...

!*cheers*!

Grant
Last edited by ozinoz on Sun Feb 10, 2013 9:06 pm, edited 1 time in total.
ozinoz
 
Posts: 1622
Joined: Fri Feb 20, 2009 1:59 am
Location: Antipodes

Re: RSC 2-8-0 CONSOLIDATION

Unread postby buzz456 » Sun Feb 10, 2013 10:04 pm

mdurdan wrote:I have ONE (and only one) objection.....the wheels shouldn't have a shiny bump map, they should be very dull. Would it be possible to edit this before release?
Otherwise this is AMAZING!!!!!!!!!!!!!!!!!!!!!!!!!!!!!!!!!!!!!!!!!!! **!!bow!!**

And why is that?
Buzz
39 and holding.
"Some people find fault like there's a reward for it."- Zig Ziglar
"If you can dream it you can do it."- Walt Disney
Image
User avatar
buzz456
Site Admin
 
Posts: 21301
Joined: Sun Mar 21, 2010 8:30 am
Location: SW Florida

Re: RSC 2-8-0 CONSOLIDATION

Unread postby buzz456 » Sun Feb 10, 2013 10:21 pm

So you are giving instructions to one of the best models we have coming down the pipe based on what you think is usual? Easy Dude.
Buzz
39 and holding.
"Some people find fault like there's a reward for it."- Zig Ziglar
"If you can dream it you can do it."- Walt Disney
Image
User avatar
buzz456
Site Admin
 
Posts: 21301
Joined: Sun Mar 21, 2010 8:30 am
Location: SW Florida

Re: RSC 2-8-0 CONSOLIDATION

Unread postby PapaXpress » Sun Feb 10, 2013 11:08 pm

Mdurdan, I disagree with you.
Image
"Just post some random unrelated text. We have members here who can help you with that." ~ Chacal
"When all else fails, read the instructions... if that doesn't work either, try following them." ~ Old Prof
Image
The Grade Crossing - Atlanta North Project - Virtual Rail Creations
User avatar
PapaXpress
 
Posts: 5147
Joined: Sat Oct 23, 2010 10:30 pm
Location: that "other" timezone

Re: RSC 2-8-0 CONSOLIDATION

Unread postby mrennie » Mon Feb 11, 2013 3:22 am

mdurdan wrote:Just a sugguestion !*don-know!*


No worries Mike, I give all suggestions due consideration. In fact, I changed the texturing of the wheels many times until I finally settled on this one. The thing is, the wheels were cast iron, with forged tires, and the best way I could find to represent that was with the bump map. I used a reasonably large bump map, 512x512 (although I sometimes wish I'd increased it to 2048x2048), with a very fine-grained bump (barely noticeable when you look at it in photoshop, because I turned the contrast right down), to give an appearance that's as close to cast iron as possible (remember, the look of a cast iron surface comes from the tightly packed sand, and inevitable air bubbles, used in the casting molds).

The other really big advantage of using a fine-grain bump map and a slightly shiny surface is that it makes a huge difference to the way the in-game lighting handles reflections, making it much more realistic, especially from the typical viewing distance. I've seen what it does when you take the exact same surface, with the exact same textures, and do it with the shader TrainBumpSpecEnvMask.fx and then with TrainSpecEnvMask.fx. The latter handles the reflections rather badly. It's like comparing a detailed oil painting with a wishy-washy water colour painting.

I also tried the other option of having a non-shiny surface for the wheels (and other parts), but again, the problem is that the game's lighting engine makes them look like cartoon drawings. Even if a surface is meant to be dull, it actually helps a lot if you use TrainBumpSpecEnvMask.fx. The trick then is to get the right colour and the right amount of bump, which comes from playing with various factors - the shades of alpha in textures, the contrast and granularity in the bump map, the contrast and colour balance in the RGB of the texture, and also - very important - manually adding shadows to the textures. If you look at the spokes of the wheels, you might notice that they do look nicely curved. That's partly because the model itself has curves, enhanced with the use of smoothing to make the normals of the surfaces imitate a rounded surface, but also because I textured them individually with a texture I made to imitate highlighting. Without that texture, the spokes would still have looked flat and cartoony from a distance, because the game lighting simply isn't able to generate those highlights realistically on its own - it needs all the extra help it can get.

Also, you have to be careful when comparing with photos of the prototype, There are so many variations. Some are dull and dirty, others are super shiny. At one point, I made the wheels the exact same colour as the rest of the loco, because that's what I saw in a close-up photo of a loco. Then I realised the loco was on static display and they'd painted almost everything in the same shiny paint to protect it from the elements!

Cheers!
Mike
User avatar
mrennie
 
Posts: 3214
Joined: Wed May 30, 2012 12:22 pm

Re: RSC 2-8-0 CONSOLIDATION

Unread postby mrennie » Mon Feb 11, 2013 3:48 am

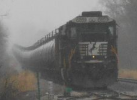
ozinoz wrote:Mike's farcebook page has some great pics - well worth a look. Finally a decent headlight projection :D

Just how did you get such great texturing on this loco. **!!bow!!** I want to start re-skinning (have some bits and pieces I want to do for Tori's wonderful COA route), but looking at this leaves me in awe and feeling very inadequate...

!*cheers*!

Grant


That headlight projection took quite a lot of experimenting to get right. I found the rules and regulations from that period where they specified that the beam had to have two settings - bright for the mainline and dim for yards (and when meeting a train coming the other way, so as not to blind the engineer of the other loco) - and that on bright, it had to be capable of illuminating an object 800 feet away. So I set up a test at night, put a guy standing 800 feet in front of the loco, and adjusted the parameters of the light projection until it lit him up *!lol!* So I can honestly say that my headlights comply with regulations !!*ok*!!

The texturing is hard to explain in a few sentences. I experimented a lot. It helps that I already knew a lot of tricks to use in Photoshop (from when I used to do scenery for Flight Simulator). Some of the textures come from photos, but a lot of them were created entirely from scratch by me, using lots of layers with different effects, like adding noise, blur, gradients, all sorts of things. I probably spent more time making textures than doing the actual model.

Just to reiterate what I explained to Mike, something that does help, in both exterior and cab views, is to use the shaders to maximum advantage, i.e. TrainBumpSpecEnvMask.fx and TrainSpecEnvMask.fx, but you have to spend a lot of time playing around with the texture files until you hit on the right combination of shiny alpha, image contrast, colour, brightness, blurring, highlighting, bumpiness, etc. Some of my source files in Photoshop have over 20 layers! It requires a lot of patience.

You also have to use the right size of texture for what you're texturing, and taking into account how closely you'll be viewing it in the game and whether it needs to be very sharp, like the face of a dial for which you'd use a large texture even though the part is relatively small. For the entire boiler, I used a file size of 1024x1024, but in retrospect it would have been better to use 2048x2048. That's a lesson I'll apply to the next loco.

There's one thing that is a real pain - 3DCrafter doesn't do shadow baking. So, I have to put the shadows into the textures manually. However, the model has literally thousands of parts, each with dozens of surfaces. To create dedicated shadow textures, manually, for thousands of surfaces is simply not on. I've done it for quite a lot of parts, where it makes more of a difference, but there are a lot that have no customised shadows in the textures. To counter that, I use textures with generic gradients (and I select an area of the texture with the gradient going in the correct direction, such as going from dark in a corner of an angle, to light at the outer edge) together with those rendering shaders again, with the bumpy shininess, because it actually helps to generate contrast between parts that would otherwise look flat, or just merge into each other, because of not having shadow baked texturing.

Incidentally, every one of those surfaces has to be mapped individually - using 3DC's "paint bucket" to apply a textur to an entire part in one go is a definite no-no. That's partly because it generates a mapping for some surfaces that is just a straight line, which in TSX off mode, translates into a completely black surface.
User avatar
mrennie
 
Posts: 3214
Joined: Wed May 30, 2012 12:22 pm

Re: RSC 2-8-0 CONSOLIDATION

Unread postby ozinoz » Mon Feb 11, 2013 4:03 pm

Many thanks for the explanation - just wish I had the nous to understand it :D

**!!bow!!**

!*cheers*!
ozinoz
 
Posts: 1622
Joined: Fri Feb 20, 2009 1:59 am
Location: Antipodes

Re: RSC 2-8-0 CONSOLIDATION

Unread postby mrennie » Mon Feb 11, 2013 4:07 pm

ozinoz wrote:Many thanks for the explanation - just wish I had the nous to understand it :D

**!!bow!!**

!*cheers*!


*!lol!* Yeah, it gets a bit technical sometimes.
User avatar
mrennie
 
Posts: 3214
Joined: Wed May 30, 2012 12:22 pm

Re: RSC 2-8-0 CONSOLIDATION

Unread postby ozinoz » Mon Feb 11, 2013 6:09 pm

That is one seriously sweet video - looks beautiful and sounds incredible. How many years has it taken to get it right... **!!bow!!**

!*cheers*!
ozinoz
 
Posts: 1622
Joined: Fri Feb 20, 2009 1:59 am
Location: Antipodes

Re: RSC 2-8-0 CONSOLIDATION

Unread postby mrennie » Mon Feb 11, 2013 6:32 pm

mdurdan wrote:Will the shininess be adjustable for re paints? :D


Yes, the driver wheels have a specific texture file (and there's another specifically for the pilot and tender wheels). All you need to do is adjust the alpha channel.
User avatar
mrennie
 
Posts: 3214
Joined: Wed May 30, 2012 12:22 pm

Re: RSC 2-8-0 CONSOLIDATION

Unread postby mrennie » Mon Feb 11, 2013 6:44 pm

ozinoz wrote:That is one seriously sweet video - looks beautiful and sounds incredible. How many years has it taken to get it right... **!!bow!!**

!*cheers*!


Glad you like it :D

I wanted to do a longer video in HD but 100MB was the limit for facebook.

Those sounds took a *lot* of trial and error. The first ones I gave to Matt didn't pass muster ... he was right too ... so I went back to the source files, sampled them again to make the individual chuffs, and used a different technique to make loops for 10mph, 12mph, 15mph, 17mph, 20mph, 30mph and 40mph, from the original loop which I'd worked out corresponded to 10mph. There are also three separate sets of chuffs for speeds below 10mph. Making authentic chuff sounds is the hardest part of the entire process. It even involved using a hex editor to change some data near the end of the oneshot .wav files (changing lowercase "list" to uppercase "LIST" ... that little trick took a while to discover). I hope won't have to tinker with them anymore!

Cheers!
Mike
User avatar
mrennie
 
Posts: 3214
Joined: Wed May 30, 2012 12:22 pm

Re: RSC 2-8-0 CONSOLIDATION

Unread postby mrennie » Sun Feb 17, 2013 12:37 pm

There are some more video clips and pictures on my Smokebox fb page.
User avatar
mrennie
 
Posts: 3214
Joined: Wed May 30, 2012 12:22 pm

Re: RSC 2-8-0 CONSOLIDATION

Unread postby ozinoz » Sun Feb 17, 2013 4:11 pm

The work you have put into this is just amazing. I loved the scene of preparing for the shift - pop open the cab rood vent for some air circulation, kick the door open and slide the window - now we can get down to business :D I have said it before, but without a doubt - you have set the benchmark for future steam locos. Hope we can see it before Easter, so we can have some time to enjoy :D

**!!bow!!**

!*cheers*!

Grant
ozinoz
 
Posts: 1622
Joined: Fri Feb 20, 2009 1:59 am
Location: Antipodes

PreviousNext

Return to DTG DLC Development & WIP

Who is online

Users browsing this forum: No registered users and 15 guests