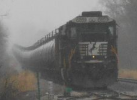
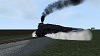
So, I’m trying to edit a route that I’m trying to build and it involves roads and rails traversing mountain slopes. I’ve watched just about every UTube video tutorial and while some get close, none of them really address how to put roads and rails on the side on hills/mountains; I.e. cuts/fills similar to what is pictured below, after you have imported your DEM data. I also have markers in play and Google Earth overlay, so I know where the roads and rails need to go. I just need some hints, tips, tricks and advise of how to “sculpt” the terrain.
Thanks in advance......
Sculpting the Terrain
First unread post • 8 posts
• Page 1 of 1
 Sculpting the Terrain
![]() by gtrtroger » Mon Mar 25, 2019 10:20 am
by gtrtroger » Mon Mar 25, 2019 10:20 am
You do not have the required permissions to view the files attached to this post.
-

gtrtroger - Posts: 1240
- Joined: Mon Jun 30, 2014 7:31 am
- Location: Montgomery, Alabama
Re: Sculpting the Terrain
![]() by buzz456 » Mon Mar 25, 2019 2:06 pm
by buzz456 » Mon Mar 25, 2019 2:06 pm
https://sites.google.com/a/railsimdev.c ... nipulation
See if this helps you out. After you get started playing around you will find this to be fairly straight forward. Make sure and make a copy that you can throw away if it gets really messed up and don't forget the undo arrow.
See if this helps you out. After you get started playing around you will find this to be fairly straight forward. Make sure and make a copy that you can throw away if it gets really messed up and don't forget the undo arrow.
Buzz
39 and holding.
"Some people find fault like there's a reward for it."- Zig Ziglar
"If you can dream it you can do it."- Walt Disney
39 and holding.
"Some people find fault like there's a reward for it."- Zig Ziglar
"If you can dream it you can do it."- Walt Disney
-
buzz456 - Site Admin
- Posts: 21250
- Joined: Sun Mar 21, 2010 8:30 am
- Location: SW Florida
Re: Sculpting the Terrain
![]() by gtrtroger » Mon Mar 25, 2019 3:39 pm
by gtrtroger » Mon Mar 25, 2019 3:39 pm
Thanks Buzz. Training begins.......
-
gtrtroger - Posts: 1240
- Joined: Mon Jun 30, 2014 7:31 am
- Location: Montgomery, Alabama
Re: Sculpting the Terrain
![]() by RailWanderer » Tue Mar 26, 2019 9:25 am
by RailWanderer » Tue Mar 26, 2019 9:25 am
Just don't expect really tight terrain changes like drainage ditches. The grid in TS is minimum 8 meters, that means anything less than 16 meters is not possible with one slope down as 8 meters and one slope back up as 8 meters. One of the tricks to making fine changes is to set the diameter of the terrain tool down to below 10 meters, 8 is better. This allows for a single point change where the grid lines cross. Remember, this is old technology, just like years ago we were lucky to have 640 resolution on our monitors, and TS is really based on the older technologies.
RailWanderer (John)
He who walks the rails must be conscious of his environment.
He who walks the rails must be conscious of his environment.
-

RailWanderer - Posts: 475
- Joined: Wed Dec 14, 2016 9:00 am
- Location: Ohio
Sculpting the Terrain
![]() by RailWorkshop » Tue Mar 26, 2019 4:05 pm
by RailWorkshop » Tue Mar 26, 2019 4:05 pm
How many tiles are loaded once in the game if I am standing at a point?
Basically how many kilometers of terrain?
I use 19*19 Import DEM data so I suppose to cut down to less value of 19*19 is fine?
Basically how many kilometers of terrain?
I use 19*19 Import DEM data so I suppose to cut down to less value of 19*19 is fine?
- RailWorkshop
- Posts: 116
- Joined: Wed Nov 14, 2018 3:18 pm
Re: Sculpting the Terrain
![]() by BoostedFridge » Thu Mar 28, 2019 11:11 pm
by BoostedFridge » Thu Mar 28, 2019 11:11 pm
RailWorkshop wrote:How many tiles are loaded once in the game if I am standing at a point?
Basically how many kilometers of terrain?
I use 19*19 Import DEM data so I suppose to cut down to less value of 19*19 is fine?
It loads the number of tiles that you have selected. Each tile is 1000m x 1000m. So with 19 x 19 you are loading the tile you are 'standing' in, and 9 in each direction.
You do not have the required permissions to view the files attached to this post.
Searchlight Simulations
https://www.store.searchlight-simulations.com/
https://www.store.searchlight-simulations.com/
-

BoostedFridge - Posts: 2277
- Joined: Sat Aug 24, 2013 6:39 am
- Location: Vancouver, BC
Re: Sculpting the Terrain
![]() by BoostedFridge » Thu Mar 28, 2019 11:51 pm
by BoostedFridge » Thu Mar 28, 2019 11:51 pm
gtrtroger wrote:So, I’m trying to edit a route that I’m trying to build and it involves roads and rails traversing mountain slopes. I’ve watched just about every UTube video tutorial and while some get close, none of them really address how to put roads and rails on the side on hills/mountains; I.e. cuts/fills similar to what is pictured below, after you have imported your DEM data. I also have markers in play and Google Earth overlay, so I know where the roads and rails need to go. I just need some hints, tips, tricks and advise of how to “sculpt” the terrain.
As Railwanderer noted below, the size of each grid square/tile is the limiting factor here. I've figured out a few techniques that help shape terrain around tracks which I'll share below. All of my experience is from starting with DEM terrain, and then shaping it to fit the roadbed, or roads.
I primarily use the 'Increase Height' , 'Decrease Height', and 'Height' tools under the 'Painting Tools' palette. Your 'brush size' for each is crucial.
When trying to build up an embankment below your tracks, I use the 'increase height' tool, with a brush size of 30, with the 'circular brush'. I would start with a fairly low brush speed, between 1 and 1.5 . I place the cursor (and center of the tool) about one grid square beside the track, on the 'low' side of the tracks. Then make small 'click and drag' movements parallel to the tracks. This will raise up the shoulder of your embankment, the side of the embankment, and not bury your tracks in the process. Once you have the sides of your embankment looking decently smooth, change to the 'height' tool, and set your brush size to 10. This will allow you to grab and drag each grid squares corner for fine adjustment. This is super tedious, but allows for exact results.
To make cuttings, I use the 'decrease height' tool. For single track cuttings I use a brush size of 20, and a circular brush if the cutting has a corner, or the square brush if it is in a straight line. As above with the embankments, click and drag the cursor parallel to the tracks, but slightly offset. Use the 'height' tool, with a brush size of 10 for your fine adjustments after.
Even using the above techniques, you will find times when you just can't make the terrain do what you want it to. This is where you should use a mixture of terrain sculpting, with carefully chosen assets or lofts. There are many embankment assets packaged with existing routes, which can also be manipulated to double as the sides of cuttings. I suggest going through ALL of the scenery assets packaged with the route you are editing.
I hope that gives you some direction. As with everything in this game though, trial and error is often the best teacher.
Searchlight Simulations
https://www.store.searchlight-simulations.com/
https://www.store.searchlight-simulations.com/
-
BoostedFridge - Posts: 2277
- Joined: Sat Aug 24, 2013 6:39 am
- Location: Vancouver, BC
Sculpting the Terrain
![]() by RailWorkshop » Fri Mar 29, 2019 3:08 pm
by RailWorkshop » Fri Mar 29, 2019 3:08 pm
BoostedFridge wrote:It loads the number of tiles that you have selected. Each tile is 1000m x 1000m. So with 19 x 19 you are loading the tile you are 'standing' in, and 9 in each direction.
Ok, thanks
- RailWorkshop
- Posts: 116
- Joined: Wed Nov 14, 2018 3:18 pm
8 posts
• Page 1 of 1
Who is online
Users browsing this forum: No registered users and 1 guest